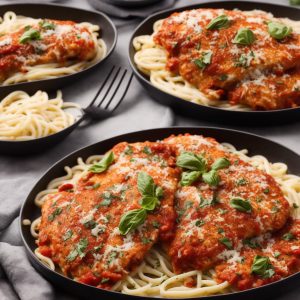
Since 1939, Pink’s has been located near the corner of Melrose and La Brea in Hollywood. It can be easily found by looking for a crowd of people and following the aroma of fresh meaty chili and soft hot dog buns. Pink’s Hot Dog Stand is a quick lunch, a nostalgic trip into the past, and a delicious experience. It is definitely a Hollywood landmark!
One of my favorite things about Pink’s is the “Super Specials” menu. From the “Walk of Fame Dog” to the “Martha Stewart Dog” (It’s a good thing!), this restaurant reflects Hollywood. For the complete Pink’s experience, check out the photo gallery on our Facebook page. I even was able to enjoy my dog next to a famous chef – check it out!
With so many great choices, it was hard to decide what dog was right for me. In the end, I went with a Pink’s classic – The Bacon-Chili-Cheese Dog. Give this recipe a try for a unique Hollywood experience at home!

1 steamed all-beef hot dog
3 slices crispy fried bacon
1/4 cup chopped tomatoes
1 slice American Cheese
2 tablespoons mustard
1/3 cup chili
1 tablespoon diced onions
1 soft hot dog bun
Spread mustard on a warm, soft hot dog bun. Place cheese on the bun, followed by the hot dog. Top with chili, bacon, tomatoes and onions.

Categories: Better Recipes, Dinner Tonight, Fast and Fabulous, On A Budget, Tasty Travel | Tags: beef, pork
No Comments
Time For A Lemonade Stand!
Summer isn’t complete without an old-fashioned lemonade stand! This sweet and refreshing recipe is great not only for kids, but adults will love it too. Sell it by the glass in your neighborhood and the profits will be rolling in!
Given a hot sun and a blue sky, passersby rarely resist a chance to buy a refreshing drink from young entrepreneurs. Many children’s first business venture is a lemonade stand. They may have as much fun with their strategic planning and production as the exchange of cold drinks for cold cash. Mom and Dad can plan on serving as the venture capitalists and quality control supervisors. This homemade lemonade recipe is a great place to start. An excellent product always ensures repeat sales, and you’ll appreciate that. After all, you may become the best customers!
Helpful Parent Tips to Keep Things Sweet
- Choose medium-size lemons that small hands can hold and press onto the lemon reamer or citrus juicer.
- Supervise the preparation: Pre-cut the lemons and fruit yourself, and let the kids help with the mixing and stirring.
- Encourage older kids to help the younger ones when pouring and straining to remove the seeds from the lemon juice.
- Have plenty of change on hand from your child’s piggy bank. You may also need to take a trip to the bank to fund the cash register.
- Help with choosing a location, sign hanging, and even sales. Don’t leave the kids alone.
Math class story problems are much more fun when they’re about the project at hand. Try these:
1. If a recipe uses 4 lemons plus sugar and water to make 6 cups of lemonade, and one cup equals 8 ounces, how many ounces of lemonade does this recipe make?
2. If you use 3-ounce cups for your stand, how many servings will you have from each batch of lemonade?
3. You paid $1 for lemons, and 25 cents for sugar. The other supplies were donated. How much profit will you make if you sell all the lemonade for 50 cents a cup?
1. 6 cups x 8 ounces per cup = 48 ounces lemonade. 2. 48 ounces lemonade divided by (symbol) 3 ounce cups = 16 servings. 3. 16 servings x 50 cents per serving = $8 projected gross profit. Gross profit ($8) – costs ($1 + 25 cents) = projected net profit ($6.75).
Lemonade Stand Checklist
- Start with a great product.
- Invest weekly allowance for capital.
- Make sure the price is right.
- Stock up on supplies.
- Make signs with lots of curb appeal.
- Sell. Sell. Sell.
2 teaspoons grated lemon peel
2 cups freshly squeezed lemon juice
2 cups granulated sugar
1-1/2 cups water
Additional water
Slices of fresh lemon
1. Combine lemon peel, juice, and sugar in a bowl or other container with lid. Stir until sugar dissolves.
2. Add 1-1/2 cups cold water and stir. Cover tightly and store in the refrigerator.
3. To make each individual serving of lemonade, pour 1/2 cup of the cold lemonade syrup into a tall glass. Add about 1/2 to 2/3 cup cold water and stir. More syrup and/or lemon syrup can be added to desired taste. Fill glass with ice cubes and a slice of lemon inside the glass and serve.
Categories: Better Recipes, Fast and Fabulous, Sweet Tooth | Tags: drink
1 Comment
Better Recipes “Cook Of The Week” Anne P.!
Get ready for some fANNEtastic food with Anne P.! Our “Cook of the Week” is a blogger who shares her secrets to living a healthy and delicious life.

How did you become interested in healthy cooking? What made you decide to start your blog?
“I didn’t really get interested in cooking until after college! At first, I relied a lot on frozen meals and dinners out, but I knew that wasn’t the healthiest (or most cost effective) approach. Slowly, I started reading food blogs and cookbooks, picking up tips, and being more adventurous in the kitchen. I was surprised to find that not only was cooking easier than I’d thought, but it was fun, too! As I got more into cooking and healthy eating, I started having friends ask for my recipes – and thus, fANNEtastic food was born! I love writing and photography as well as cooking, so a blog just made perfect sense.”
I see you have lived and traveled all over the globe. How do your travel experiences influence your cooking?
“I lived in Prague from 2008-2009 teaching English, and that was when I really started getting into cooking for myself. I wasn’t a big fan of the restaurants there, so that really motivated me! I learned how to put together delicious, but very simple (and quick) meals, since I couldn’t understand any of the Czech food labels at the store! I once bought sour cream, thinking it was yogurt… that was quite a shock!”
What are some of your tips for healthy cooking? Do you have any advice to share with Better Recipes?
“I’m a huge fan of substitutions in recipes! One of my favorite things to do is to take a recipe and modify it in a healthier (but still tasty) way. In particular, I always use Greek yogurt instead of sour cream or mayo (check out my Healthy Deviled Eggs, Chicken Salad, and Tuna Salad recipes!).
I also love making healthy muffins! Muffins are normally very heavy and calorie-laden sugar bombs, but with a few easy swaps, they can become a delicious and nutritious snack or breakfast. Here are some of my favorite muffin modifications.”
- Whole wheat pastry flour instead of white flour (pastry flour has a much softer, less dense texture than regular whole wheat flour)
- Applesauce, Greek yogurt, canned pumpkin, or canned sweet potato instead of oil (these keeps the muffins nice and moist without the extra calories and fat!)
- Adding super ripe mashed bananas to the batter for sweetness and decreasing the amount of regular sugar
- Adding in nuts or ground flaxseed to increase the nutritional profile
Thanks so much, Anne! Today is all about MUFFIN MADNESS. Check out three of Anne’s favorite healthy muffin recipes.
![]()
Pumpkin Muffins (or Bread) of Deliciousness
“Yum! These have a great flavor, the perfect amount of sweetness, and a nice, soft texture. Nutritious, too!”
Ingredients:
Dry:
1.5 C whole wheat pastry flour
1/2 C brown sugar
1 tsp cinnamon
1 tsp pumpkin pie spice
1 tsp salt
1/2 tsp baking soda
Wet:
1 C canned pumpkin
1/2 C raisins (or chocolate chips)
1/4 C nonfat vanilla Greek yogurt
1/4 C unsweetened applesauce
2 egg whites (this is equal to 1/3 C liquid egg whites from a carton)
Instructions:
Preheat oven to 350.
In two separate bowls, mix dry, then wet, and then combine, adding wet to dry and stirring gently until the mixture is uniform-ish.
Depending if you are making bread or muffins, either spoon the mixture into a non-stick (or sprayed with PAM) muffin tray or bread pan. Don’t forget to sprinkle some raw oats on top to make ‘em look pretty!
Pop them in the oven for about 25 minutes (for muffins) or 75 minutes (for bread) and do a fork check near the end to test done-ness.
ENJOY!
![]()
Sweet Potato Cranberry Coconut Muffins
“These are not only soft and delicious, but healthy – no butter or oil and packed with nutrition from the whole wheat flour, flax, sweet potato, etc! Great flavor combination, too.”
Ingredients:
Dry:
1.5 C whole wheat pastry flour
1/2 C brown sugar
1/4 C finely ground flax
1 Tbsp pumpkin pie spice
1/2 tsp salt
1/2 tsp baking soda
Wet:
1 C canned pureed sweet potato
1/2 C dried cranberries
1/4 C nonfat plain Greek yogurt
1/4 C skim milk
1/4 C unsweetened applesauce
1/4 C unsweetened coconut
2 eggs
Instructions:
Preheat oven to 350.
In two separate bowls, mix dry, then wet, and then combine, adding wet to dry and stirring gently until the mixture is uniform-ish.
Spoon the mixture into a cooking-sprayed or nonstick muffin tin. Add some extra unsweetened coconut on top of the muffins
![]()
“These are easy, healthy, and incredibly delicious. Not to mention cute! Make them for a brunch party or enjoy them as an easy on-the-go breakfast, lunch, or dinner.”
Ingredients:
9 eggs
1/2 C chopped fresh spinach
1/3 C skim milk
1/3 C spelt flour (or whole wheat pastry flour)
1/4 C 2% grated cheddar cheese
1 Tbsp. chopped fresh basil
1 small tomato, chopped
1/2 tsp. sea salt
1/2 tsp. cracked black pepper
Instructions:
*Preheat oven to 350.
1) Break the eggs into a bowl and whisk.
2) Add the rest of your ingredients and mix it all together!
3) Add spoonfuls of the mixture to a cooking sprayed or nonstick muffin tin. I used a 1/4 C measuring cup to transfer it since it’s very liquid-y!
4) Pop them in the oven and bake for 25 to 30 minutes. Fork check to make sure they are done.
Voila!
Categories: Better Recipes, Fresh and Healthy, Sweet Tooth, Tips and Tricks | Tags: bread, breakfast, easy breakfast, healthy breakfast, low-fat breakfast, muffins and scones, sweet bread, whole wheat bread
3 Comments
Catalina Island Food And Fun!
Just a quick boat ride away from Los Angeles lies an island getaway. Stepping off the boat, you would swear you arrived in Capri or maybe the south of France! Catalina Island is the perfect getaway for a relaxing weekend or even a fun day trip. On Friday, I did just that!
This is a view from the harbor in Avalon. In the distance is the Catalina Casino. (Unfortunately, there isn’t any gambling there!) Built in 1929, the Casino – Italian for a “place of entertainment” – played host to dozens of Big Bands through the 1930s and 1940s. Today it holds an art gallery, movie theatre and museum.
Catalina Island has a long and interesting history. In fact, for 30 years William Wrigley Jr. brought his baseball team, the Chicago Cubs, to Catalina Island for spring training. The baseball field on Catalina Island was built to match the dimensions of Wrigley Field in Chicago. Not a bad way to escape the Chicago cold!
Catalina Island has also served as the location for the filming of over 500 motion pictures, documentaries, television programs and commercials over the past 90 years. The Island’s unique natural beauty and accessibility were the major factors. Production crews and sets could be sent to the Island by barge, and the vast, untouched mountains and beaches could be transformed into almost any place in the world.
Another interesting and lasting impression of this unique history was the introduction of the North American Bison to the Island. Many believe that the bison were brought to the Island for the production of “The Vanishing American,” the film version of Zane Grey’s classic novel, released by the Lasky Film Corporation in 1925. Upon completion of the film, the producers didn’t bother to return the buffalo to the mainland. The bison took up permanent residency on the island and a herd has been roaming the hills of Catalina ever since!
Buffalo has also become a mainstay on restaurant menu’s on the island. If you have never tried buffalo, I highly recommend it! It is extremely lean, healthy and very flavorful. Check out some of the buffalo recipes from Better Recipes:
Buffalo Burgers with Cactus, Corn, Tomatillo
Buffalo-Stuffed Portobella Burger
Buffalo and Couscous Stuffed Peppers
There are also a plethora of activities on the island, with something to meet everyone’s needs. For some it’s scuba diving, snorkeling, parasailing, kayaking or fishing. For others its hiking, biking, playing golf or exploring charming shops and galleries. And then there are those who prefer to do nothing but relax on the beach! My friend Gretel and I decided to be a little adventurous and try the newest activity on the island – a zipline!
It was such a thrill and an absolute blast! I took a ton of great pictures on the island and have uploaded them to a gallery on the Better Recipes Facebook page. Check it out!
Categories: Around the World, Better Recipes, Tasty Travel | Tags: beef, grilled burgers & brats, grilling, healthy meat
1 Comment
TGIF: Grilled Banana Split
It’s time to think about grilling in a whole new way this week! For this installment of TGIF, “Think Grilling It’s Friday,” we are going to take a traditional ice cream shoppe favorite and turn it on its head. If you like banana splits, you are going to love this!
I started by taking the fruits you would traditionally find in a banana split and skewered them as a fruit kabob. Then I mixed together some melted butter and rum (ooh, yeah…) and brushed it over the fruit. Then simply grill the kabobs until the fruit is warm and the bananas slightly brown.
Scoop up some chocolate, vanilla and strawberry ice cream and drizzle with your favorite toppings. Here I used caramel and a few toasted pecans. Place your grilled fruit kabob on top and voila! A Grilled Banana Split!
8 wooden skewers, 6-8 inch size
2 large bananas, peeled and cut into 1 to 1-1/2 inch pieces
1/4 of a small pineapple, peeled, cored, and cut into 1 to 1-1/2 inch pieces
8 large strawberries
2 Tablespoons butter, melted
1 teaspoon brandy, rum, or pineapple juice
2 pints vanilla, strawberry, or chocolate ice cream (or a combination)
Caramel, butterscotch, and/or chocolate ice cream topping
Chopped pecans, toasted
1. Soak skewers in warm water for 30 minutes before grilling; drain. Thread bananas, pineapple, and strawberries onto skewers, leaving 1/4″ space between pieces.
2. In a small bowl, combine melted butter and brandy. Brush mixture over fruit.
3. Lightly coat the unheated grill rack with cooking spray. For a charcoal grill, grill skewers on the rack of an uncovered grill directly over medium-hot coals for 5-10 minutes, or until fruits are warm and bananas are lightly browned, turning skewers occasionally. For a gas grill, preheat grill. Reduce heat to medium-high. Place skewers on grill rack over heat. Cover; grill as above. Remove from grill.
4. Place scoops of ice cream in serving dishes. Drizzle with ice cream topping and sprinkle with nuts. Top with fruit skewers and serve immediately. Serves 4.
Have you been following the TGIF series this summer? Check out past grilling articles:
Categories: Better Recipes, Celebrations and Parties, Fast and Fabulous, Sweet Tooth | Tags: dessert, easy, fruit dessert, grilled dessert, grilled kabob, grilling, ice cream & sorbets
3 Comments
Fresh Catch!
It’s no secret, I LOVE salmon! Earlier this year I posted a recipe for Lime and Honey Baked Salmon, but now that the weather is warmer, it is time to toss the fish on the grill! In the summer, my dad heads up to Michigan’s Upper Peninsula (or ‘da UP as “Yoopers” call it!) to visit his cousins and do some fishing.
It is always such a treat when he returns with some gorgeous fresh caught steelhead, and it’s even better when he brings it back all cleaned and filleted! There he is showing off the catch of the day!
This recipe is a simple yet flavorful preparation that really highlights the fish. It tastes even better when I snip fresh herbs from my mom’s garden!
GRILLED SALMON WITH HERB CRUST
Four 4 to 5-ounce fresh skinless salmon fillets, about 3/4-inch thick (or 1 whole piece of salmon)
1/3 cup coarsely chopped fresh oregano
1/3 cup coarsely chopped fresh cilantro
1/4 cup sliced green onion
1 Tablespoon lemon juice
1 Tablespoon olive oil
1 clove garlic, peeled and halved
1/4 teaspoon salt
1/8 teaspoon black pepper
1. Rinse fish; pat dry and set aside.
2. In a food processor or blender, combine oregano, cilantro, green onion, lemon juice, oil, garlic, salt, and pepper, Cover and process until finely chopped. Generously coat all sides of fish with herb mixture.
3. For a charcoal grill, place fish on the rack on an uncovered grill directly over medium coals. Grill for 6-8 minutes or just until the salmon flakes easily when tested with a fork, turning once halfway through grilling. For a gas grill, preheat grill. Reduce heat to medium. Place salmon on grill rack over heat. Cover and grill as above. Makes 4 servings.
Nutrition information per serving: 236 cal.; 15 g fat (3 g sat.fat); 66 mg chol.; 23 g protein; 2 g carbo.; 0 g fiber; 192 mg sod.; Exchanges: 3.5 lean meat, 0.5 fat
Categories: Better Recipes, Dinner Tonight, Fast and Fabulous, Fresh and Healthy | Tags: easy, easy seafood, fish, grilled fish, grilling, healthy, healthy fish, main dishes, salmon, seafood
2 Comments
Behind The Scenes At The Food Network
Come with me on a behind the scenes tour of the Food Network! From the test kitchens where recipes are developed, to the studio set where your favorite shows are filmed. Food Network star Sunny Anderson even gives a special “shout out” to Better Recipes!
Were you inspired by all those burgers being tested in the Food Network test kitchen? Get creative and enter your best burger in our monthly contest! Hurry -- entries are due by the end of the month. Remember, $1,000 could be yours!
If you enjoyed that video, you will love the Food Network photo gallery on our Facebook page! In addition to our peek behind the scenes, I wanted to get an inside scoop on this season of Next Food Network Star. If you have been following this season, you know that the stakes are high and the talent is top notch. I think there are a few early stand-outs, but I have a special affinity for Aarti Sequeira, aka “Aarti Paarti!” She and I both attended Northwestern University, so I have to root for a fellow “Wildcat!” I had a chance to ask Aarti a few questions about her culinary background and experience on the show.

(Photo courtesy of Food Network)
Tell us a little bit about your cooking background!
“I spent a lot of my childhood in my mum’s kitchen, watching and helping her prepare traditional Indian dishes. We were living in Dubai, far from our home in India, so eating those traditional foods were so important to maintaining that lifeline to the motherland. I baked a lot, but never tried cooking on my own until I was in college, when those same dishes turned out as colossal failures! Oh man, were they bad! Once I moved to LA, and I was lost, my husband noticed how planning dinner was becoming the highlight of my day; I couldn’t drive, so every day, after picking a recipe out of “the joy of cooking”, I’d walk 20 minutes to the store, buy groceries, and walk another 20 minutes back home. By the time Bren got home, there was a piping hot meal ready to devour. For Christmas that year, Bren got me enrolled at the New School of Cooking in Culver City, a few doors down from my house — it’s a part-time professional cooking program. When I graduated, I interned at a James Beard Award-winning restaurant, Lucques, for a short spell before realising that was not the job for me. Back to me being lost for a while, but still cooking… and a few years later, blogging and shooting aarti paarti. Phew!”
Why did you decide to audition for NFNS?
“By the time I applied, I had been doing on online cooking show, aartipaarti (aartipaarti.com) for about 8 months. Actually, let me really set the scene here. I was at a total loss. When I had graduated from uni, my belly was on fire for journalism. I had such a burning passion for it, and I landed my dream job straight out of school: working at CNN. But after a few years, I realised that the passion wasn’t there anymore. There I was in LA, having relocated from NY after marrying the love of my life (who I’d met on the 2nd day of new student week at uni!), but with no job. I struggled for 5 years, going from unemployment to working on myriad projects, including a documentary about Darfur, called “sand and sorrow.” But still, I didn’t have that purpose that made me jump out of bed every morning. I began to think that didn’t exist. When I started doing aarti paarti though, I suddenly understood. This was fun! And people thought I was good at it! A couple of close friends, and my husband, encouraged me to try out for The Next Food Network Star, while I had little confidence in my ability to do it, I was driven by other people’s confidence in me. I figured, what do I have to lose, right? So I sent in a video that my husband shot, of me making a strawberry-basil-black pepper lassi, and that was enough to merit a callback flight to NY! After that, the ball was rolling, and I couldn’t stop it. I was so scared to do the show, and wished I could back out, but I didn’t want to let anyone down. That’s why I look so damned scared on the first few episodes; I really didn’t think I’d get very far, and worse, that I’d look a fool before being sent home.”
What advice would you have for people who want to try out for next season?
“First off, be yourself! I think some people have this old-fashioned image of what it takes to be on camera — a huge, cheesy personality, with lots of yelling and mugging for the camera. But if that’s not who you are, it’s not going to work. Be yourself. I always think of someone like Ina Garten — she has this laid-back warmth that gently wraps itself around you and seduces you into spending 30 minutes with her. If you’re anything other than who you are, then don’t do it. Also, be prepared for a grueling schedule. Some nights, we only slept 3 hours. And finally, KNOW your point of view. If you don’t have a strong point of view, you’re cooked.”
I know you can’t reveal the outcome of the show, but what are your plans for the future? Will you continue to pursue your passion for food?
“I don’t know how to live without a passion for food! I plan to continue shooting my cooking show — being on The Next Food Network Star actually really helped me figure out what my unique style, and that is such a precious gift. I had been so lost before, cooking Indian-Arabic-California cuisine. Now I realise that my passion is to find ways to bridge the gap in my heart between my home in India, and my new home in America. And you’ll find that reflected in my food. Take my grilled cheese with tomato chutney: a simple grilled cheese sandwich (picture perfect American food) with a complex sweet and tangy Indian chutney. That’s me on a plate!”
GRILLED CHEESE WITH TOMATO CHUTNEY
Recipe courtesy: Aarti Sequeira
2 cups grape tomatoes
a little more than 1/4 cup apple cider vinegar
1/2 cup red onion, chopped finely
1 clove garlic, minced
1 tbsp ginger, minced
1 tbsp brown sugar
Handful cilantro, minced
2 tbsp vegetable/canola oil
1 tsp urad dal (optional)
1 tsp black mustard seeds
Pinch of red chili flakes
1/2 tsp cumin seeds
White bread
Cheese of your choice, freshly grated (I used cheddar)
Mayonnaise
Throw tomatoes, vinegar, and onions in a pot over high heat. Season with salt and boil for 5 minutes.
Add garlic, ginger, cilantro, and brown sugar, plus a splash of water if it’s too dry. Stir and boil for another 5 minutes.
Meanwhile, in a small skillet, warm oil until shimmering. Add urad dal and red chili flakes.
When dal has turned a little darker, add mustard seeds, and stand back! They’ll splutter! Once they’re done spluttering, pour into the tomato mixture (which should be done boiling).
Turn the heat down, simmer 20 minutes until the tomato mixture takes on a jam consistency. Try to keep some of the tomatoes whole.
Allow chutney to cool.
Heat nonstick or cast iron skillet over moderately low heat. Build the sandwich, slathering the bread with cheese and tomato chutney.
Slather some mayonnaise on the outside of one side of the sandwich. Place it mayo-side down in the skillet. Spread mayo on the other side.
Wait a couple of minutes until it’s browned, then flip and brown the other side.
Cut into triangles and serve!
Categories: Around the World, Better Recipes, Celebrations and Parties, Foodie Events, Tasty Travel | Tags: appetizer, cheese, easy sandwich, sandwich, vegetarian, vegetarian dinner
3 Comments
Better Recipes “Cook Of The Week” Jannine Fisk
Our “Cook of the Week” is “BakingMeCrazy” also known as the amazing, Jannine Fisk! Jannine just showed off her baking prowess last month as the winner of the Better Recipes “Birthday Cakes and Cupcakes Challenge.” Once you see her delectable recipe, you will know why! Let’s find out more about this cooking contest veteran. Check out my Q & A!
How did you come up with your winning recipe?
“I decided to try and recreate a cake I had seen on a trip to Maryland’s Eastern Shore last spring. My friends introduced me to a local specialty called “Smith Island Cakes”. These are very tall, impressive cakes, that come in many flavors. These cakes are at least six layers and sometimes as tall as twelve, but the layers are all baked individually instead of being split horizontally. I love chocolate covered strawberries and I had decorated birthday cakes in the past with them, so I thought it would be great to have a thin layer of strawberries in between the chocolate layers of the cake. I also felt that using ganache instead of icing in between the layers would add a richness and new dimension of flavor, as well as help with the stability of such a tall cake.”
Do you enter the Better Recipes contest every month?
“I have entered several of the Better Recipes contests in the past, but this is the first time I have been chosen as a winner. I couldn’t be happier!”
Do you enter recipe contests often? What other contests have you won?
“I have been entering recipe and baking contests for the past 11 years and I have a few wins under my apron!
I was recently one of 100 finalists at the 44th Pillsbury Bake-Off Contest in Orlando, FL. (which is where I got to finally meet you in person!) I was also one of four winners in Cake Mate’s “Mother of All Bake Sales” for my “Bake-Sale Brownie Burger Bites” recipe. I have won three separate contests on mixingbowl.com; an appetizer contest for my “Big Game Buffalo Chicken and Bacon Bites”, an apple dish contest with my “CranApple Crumble Pie” and most recently a kid’s cupcake challenge for my “Lovable Lion Cupcakes”, which were also featured in the May issue of Parents Magazine. I have also won first place in a breakfast recipe contest sponsored by MyOmelet.com for my “Cinnalicious Belgian Waffles”. Most recently, I was notified a few days ago that I won second place in Boar’s Head EverRoast Dare2Prepare recipe contest for my “EverRoast Zippy Tuscan Chicken Nibblers”. Aside from the online recipe contests, I also have over 200 blue ribbons from the Topsfield Fair in Massachusetts, which is the oldest agricultural fair in the country. At last year’s Fair, I also won all three major awards in the Beekeeping Department’s Cooking With Honey Contests, which were for “Best in Show”, “Most ribbon-winning entries” and “Best Challenge Recipe”.
Wow! That’s fantastic! What advice do you have for other people who want to enter (and possibly win!) a Better Recipes contest?
“My advice would be to follow the rules exactly. Read them, re-read them and make sure you understand them before you submit your entry. If you are required to use a particular product, make sure that product is listed in the ingredients list. If a photo is required, take a good one with as much natural light as possible. Sometimes a clear and appetizing photo can make the difference between a good entry and a great one. Lastly, give your recipe a catchy or clever name. Try and come up with something that will make the judges or the test panel give your entry a second look. Above all, have FUN!”
Great advice! What are you going to do with the prize money?
“My trusty old Kitchen-Aid mixer has served me well, but it is starting to wear and is in need of being replaced. I have always wanted a Viking brand 7 quart stand mixer but the price tag had always been a little too high for my budget. I would love to use the money to buy that mixer, however on the day I was notified that I was a winner in this contest, I also received a $700 insurance bill for my recent hand surgery. I guess I’ll have to try and win another contest and hope my Kitchen-Aid hangs on a little longer!”
Eeek! Sorry to hear that! Will you continue to enter Better Recipes contests?
“I will most definitely continue to enter Better Recipe contests! I love coming up with new creations and after all, I have that mixer to buy!”
Interested in being featured as the Better Recipes “Cook of the Week?” We would love to hear from you! Simply become a fan on Facebook, follow us on Twitter and send us a message to tell us about yourself and your cooking!
Cake Layers:
- 3 cups sugar
- 3 1/2 cups all purpose flour
- 1 1/2 cups Dutch process cocoa
- 4 tsp baking soda
- 2 tsp baking powder
- 2 tsp salt
- 1 cup honey
- 4 large eggs
- 2 cups buttermilk
- 2 cups strong brewed coffee, cooled
- 1 cup vegetable oil
- 2 tsp vanilla
Chocolate Ganache Filling:
- 1 cup heavy cream
- 8 oz semisweet chocolate
- 1 tsp instant coffee granules
- Chocolate Buttercream Icing:
- 1 cup butter
- 8 tbsp half and half
- 2 tsp vanilla
- 1 1/2 cups Dutch process cocoa
- 2 lbs confectioners sugar
Garnish:
- 1 1/2 pounds fresh strawberries, divided
- 1 cup semisweet chocolate morsels
- Chocolate buttercream icing
- 30 chocolate wafer cookies, finely crushed
- 2 oz milk chocolate for shavings and curls
Preheat oven to 350 degrees. Grease and flour four 9 inch round baking pans. Line with parchment and set aside. In a large bowl, stir together all dry ingredients. Add remaining ingredients and beat on medium speed for 3 minutes. Pour half of batter into another bowl and divide remaining batter evenly into four prepared pans. Bake 18-22 minutes or until a tester comes out clean. Cool 5 minutes, then turn out onto racks, removing parchment. Wash and dry pans and repeat process with remaining batter. When finished, you will have eight thin layers. Meanwhile prepare ganache. In a saucepan over medium heat. Warm heavy cream until just boiling. Place semi-sweet chocolate in a large bowl, add instant coffee and pour boiling cream over top. Let sit for 1 minute, then whisk until melted, smooth and silky. Refrigerate 1 hour or until thickened, stirring every 15 minutes. Wash and dry strawberries thoroughly. Set aside 12 whole berries. Remove tops from remaining berries, slice thinly, and set aside. Melt 1 cup semi-sweet chocolate in microwave, then dip whole strawberries 3/4 way into melted chocolate. Let cool on waxed paper in refrigerator. Icing: Mix butter, half and half and vanilla well in a large bowl, then gradually add cocoa and confectioners sugar. Beat until smooth and fluffy. Assemble: Place one cake layer on a platter. Spread with about 1/4 cup ganache and top with next layer. Continue alternating ganache and cake layers, pressing a thin layer of sliced strawberries between every other layer. End with a layer of cake on top. Frost cake, reserving some for decoration. Press crushed chocolate wafers onto sides of cake. Pipe 12 rosettes on top edge of cake, then place chocolate covered strawberries in between. Sprinkle center with chocolate shavings and curls. Decorate bottom edge with remaining icing.
Categories: Better Recipes, Celebrations and Parties, Holidays, Sweet Tooth, Tips and Tricks | Tags: cake, cakes, dessert, fruit dessert
2 Comments
Dining at The Plaza
I have always been enamored with The Plaza. One of my earliest memories as a child is from my first trip to New York City. Our hotel room window overlooked the crossroads of Fifth Avenue and Central Park South and I remember sitting for hours, gazing down at the iconic hotel and the hustle and bustle below.
After undergoing a three-year restoration, The Plaza has re-opened with an array of culinary offerings. It is just as magical as I remembered, and I couldn’t wait to explore the brand new Plaza Food Hall and sip tea in The Palm Court.
Created by Chef Todd English, this is so much more than a food court. Like the famous Harrods in London, this food hall is an experience with sights, smells and, of course, tastes that entice. Todd says, “There will literally be something for everyone, and so many choices you could come back every day and always find something new to excite you!”
The food hall features eight different food stations showcasing various cuisines with dishes that can be made to order, or even prepared for the guests to take and enjoy at home. In addition a variety of merchandise is available throughout the Food Hall – fresh flowers, a range of international specialty foods, cookware and home goods. There is even a demo kitchen ready for Todd English or visiting chefs to show off their skills.
What I like best about the Food Hall is that there is literally something for everybody. This is the perfect place to gather with a group of friends for dinner and a drink. The prices are reasonable (shocking, I know!) and with so many choices everyone will find something to satisfy their craving. There is the Dumpling Bar, with it’s Pan-Asian menu offering a variety of noodles and dumplings. The Sushi Bar with an assortment of rolls, sashimi and sushi. American fare at The Grill featuring burgers and sandwiches. There is the catch of the day at The Ocean Grill and Oyster Bar, made-to-order flatbread from the Brick Oven Pizza or hand selected meats and cheese from The Cheese and Charcuterie Counter. The Wine Bar is staffed by a Sommeier with an array of domestic and international selections along with small plates and tapas. Finally, The Bakery offers freshly baked pastries and a wide array of chocolates and candies.
To get a real feel for the Food Hall, you simply have to check out the photo gallery on our Facebook page. You can see the various food stations as well as some of the phenomenal food I sampled from each one!
No culinary tour of The Plaza would be complete without an elegant and sophisticated afternoon tea. It just happened to be my sister’s birthday (cheers Kara!) so we made a reservation at the newly restored Palm Court. Known as the heart and soul of The Plaza, this vast, airy landmark space is bordered by mirrors, marble columns and is crowned with a domed yellow-and-green skylight. Their menu is a fusion of traditional and modern and the experience is indulgent, exquisite and truly unforgettable.
We ordered “The New Yorker” tea service, but they also offer “The Classic,” with lobster and caviar, “Chocolate Tea,” overflowing with chocolate fondue and other sweets, and the “Eloise Tea” a menu with sandwiches and savories for the younger guests. Again, for the full experience, take a look at the photo gallery on our Facebook page. They even made a special dish in honor of my sister’s birthday, check it out! The splendor and luxury of The Plaza never disappoints and I continue to be as awe inspired by this iconic landmark as I was as a child.
Categories: Around the World, Better Recipes, Foodie Events, Tasty Travel | Tags:
1 Comment
TGIF: My Favorite Baby Back Ribs
When I first tried this recipe, I had the neighbors peering over the fence to see what smelled so fantastic! These ribs are lick your fingers, enjoy every last bite good. The meat simply falls off the bone and a bit of rum in the bbq sauce is my secret ingredient. I also like to make sure that the ribs are from top-quality pork to ensure the most tender and delicious results. I purchased these baby back ribs from US Wellness Meats where their motto is, “Our animals eat right so you can too!” After my organic education in Vermont, my eyes were opened to the importance of sustainable farming practices in order to avoid harmful additives like hormones and antibiotics. Grass-raised animals pass the best of their nutrient-rich diet on to you and the meat simply tastes better!

Barbecued Baby Back Ribs with Rum
2 slabs baby back ribs, about 3-4 pounds total
1 cup firmly packed light brown sugar
1/2 cup chili sauce
1/4 cup ketchup
1/4 cup dark rum
1/4 cup soy sauce
1/4 cup Worcestershire sauce
1 teaspoon dry mustard
2 cloves garlic, crushed
1/8 teaspoon black pepper
1. Wrap each slab in double thickness of aluminum foil and place on a large pan. Bake at 350 degrees for 1-1/2 hours. Unwrap and drain drippings.
2. Return ribs to pan. Combine the remaining ingredients and pour over ribs, coating each one well. Marinate at room temperature for 1-2 hours; or cool, cover, and marinate overnight in refrigerator.
3. When ready to grill, lay ribs above medium-hot coals. Grill for 30 minutes, turning and basting with sauce about every 10 minutes. Serves 6.
Categories: Better Recipes, Celebrations and Parties, Dinner Tonight | Tags: grilled meat, grilling, main dishes, pork, ribs
1 Comment


